Opencv显示与绘制
OpenCV 的基础绘制功能
OpenCV 中提供直线、椭圆、矩形、圆以及多边形的绘制功能。 在OpenCV 的图形绘制中我们会经常使用以下两种结构:
- cv::Point 和cv::Scalar
cv::Point 表示2D 平面上的点,通过指定其在图像上的坐标位置x 和y 来实现。
语法结构如下:
Point pt; pt.x = 10; pt.y = 8; 或者 Point pt = Point(10, 8);
cv::Scalar 表示一个含有4 个元素的向量,OpenCV 中用来传递像素值。
语法结构如下:
Scalar( a, b, c )
其中Blue = a, Green = b, Red = c。这里由于我们只有BGR 三个颜色值,所以我们只需要定义三个变量,最后一个元素可以省略。
下面开始介绍直线、椭圆、矩形、圆以及多边形分别的语法结构:
直线
CV_EXPORTS_W void line(InputOutputArray img, Point pt1, Point pt2, const Scalar& color,
                     int thickness = 1, int lineType = LINE_8, int shift = 0);
参数:
- img: 图像
- pt: 线段的起点
- pt2: 线段的终点
- color: 直线的颜色
- thickness: 直线的粗细
- lineType: 直线类型,具体可以参考下表
- shift: 点坐标中的小数点位数
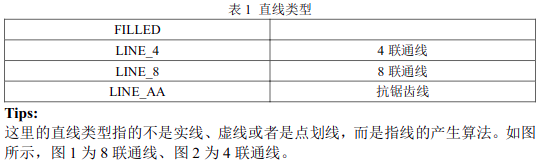
8 联通线是指下一个点连接上一个点的边或者角,4 联通线是指下一个点与上一个点边相连。4 联通线消除了8 联通线的断裂瑕疵
椭圆
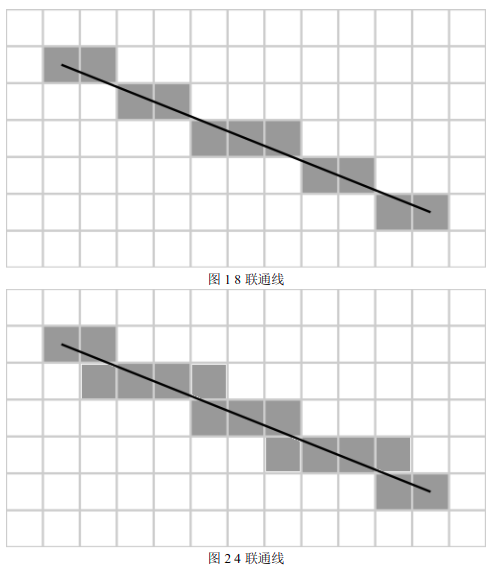
CV_EXPORTS_W void ellipse(InputOutputArray img, Point center, Size axes,
                        double angle, double startAngle, double endAngle,
                        const Scalar& color, int thickness = 1,
                        int lineType = LINE_8, int shift = 0);
参数:
- img: 图像
- center: 椭圆中心
- axes: 椭圆主轴尺寸的一半
- angle: 椭圆旋转角度
- startAngle: 椭圆弧的起始角度
- engAngle: 椭圆弧的终止角度
- color: 椭圆的颜色
- thickness: 椭圆轮廓的粗细,如果不设置默认填充
- lineType: 椭圆边界线类型 shift: 中心坐标和轴值的小数点位数
cv::ellipse 可以用来绘制椭圆线、实心椭圆、椭圆弧、椭圆扇面。如果想要绘制一个完整的椭圆,startAngle=0、endAngle=360。如果起始角度大于终止角度,他们会进行交换。下图 在绘制蓝色弧时各个参数的含义。
矩形
CV_EXPORTS_W void rectangle(InputOutputArray img, Point pt1, Point pt2,
                          const Scalar& color, int thickness = 1,
                          int lineType = LINE_8, int shift = 0);
参数:
- img: 图像
- pt1: 矩形的顶点
- pt2:与pt1 相对的矩形顶点
- color: 矩形颜色或者亮度
- thickness: 矩形轮廓的粗细
- lineType: 线条类型
- shift: 点坐标中的小数点位数
多线段
CV_EXPORTS void polylines(Mat& img, const Point* const* pts, const int* npts,
                          int ncontours, bool isClosed, const Scalar& color,
                          int thickness = 1, int lineType = LINE_8, int shift = 0 );
参数:
- img: 图像
- pts: 多边形曲线阵列
- isClosed: 所绘制多段线是否闭合
- color: 多段线颜色
- thickness: 多段线粗细
- lineType: 多段线种类
- shift: 点坐标中的小数点位数
多边形填充
CV_EXPORTS void fillPoly(Mat& img, const Point** pts,
                         const int* npts, int ncontours,
                         const Scalar& color, int lineType = LINE_8, int shift = 0,
                         Point offset = Point() );
cv::fillPoly 可以填充由多边形包围的区域,可用于填充复杂区域。
参数:
- img: 图像
- pts: 多边形数组,每个多边形都是一组点
- npts: 顶点个数
- ncontours: 多边形轮廓个数
- color: 多边形颜色
- lineType: 多边形边界粗细
- shift: 点坐标的小数点位数
- offset: 可选择轮廓点偏移量
实例
#include <opencv2/core.hpp>
#include <opencv2/imgproc.hpp>
#include <opencv2/highgui.hpp>
#define w 400
using namespace cv;
void MyEllipse( Mat img, double angle );
void MyFilledCircle( Mat img, Point center );
void MyPolygon( Mat img );
void MyLine( Mat img, Point start, Point end );
int main( void ){
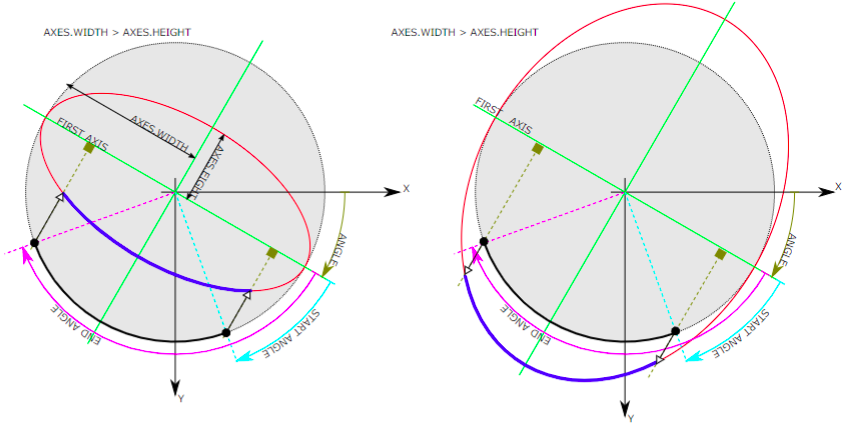
//创建两个窗口和两个图像来进行图形绘制
char atom_window[] = "Drawing 1: Atom";
char rook_window[] = "Drawing 2: Rook";
Mat atom_image = Mat::zeros( w, w, CV_8UC3 );
Mat rook_image = Mat::zeros( w, w, CV_8UC3 );
//原子图像绘制,创建了MyEllipse 和MyFilledCircle 两个函数
MyEllipse( atom_image, 90 );
MyEllipse( atom_image, 0 );
MyEllipse( atom_image, 45 );
MyEllipse( atom_image, -45 );
MyFilledCircle( atom_image, Point( w/2, w/2) );
//绘制国际象棋的车创建了MyPolygon 和MyLine 函数,且应用了矩形的绘制函数
MyPolygon( rook_image );
rectangle( rook_image,
Point( 0, 7*w/8 ),
Point( w, w),
Scalar( 0, 255, 255 ),
FILLED,
LINE_8 );
MyLine( rook_image, Point( 0, 15*w/16 ), Point( w, 15*w/16 ) );
MyLine( rook_image, Point( w/4, 7*w/8 ), Point( w/4, w ) );
MyLine( rook_image, Point( w/2, 7*w/8 ), Point( w/2, w ) );
MyLine( rook_image, Point( 3*w/4, 7*w/8 ), Point( 3*w/4, w ) );
imshow( atom_window, atom_image );
moveWindow( atom_window, 0, 200 );
imshow( rook_window, rook_image );
moveWindow( rook_window, w, 200 );
waitKey( 0 );
return(0);
}
void MyEllipse( Mat img, double angle )
{
int thickness = 2;
int lineType = 8;
ellipse( img,
Point( w/2, w/2 ),
Size( w/4, w/16 ),
angle,
0,
360,
Scalar( 255, 0, 0 ),
thickness,
lineType );
}
void MyFilledCircle( Mat img, Point center )
{
circle( img,
center,
w/32,
Scalar( 0, 0, 255 ),
FILLED,
LINE_8 );
}
void MyPolygon( Mat img )
{
int lineType = LINE_8;
Point rook_points[1][20];
rook_points[0][0] = Point( w/4, 7*w/8 );
rook_points[0][1] = Point( 3*w/4, 7*w/8 );
rook_points[0][2] = Point( 3*w/4, 13*w/16 );
rook_points[0][3] = Point( 11*w/16, 13*w/16 );
rook_points[0][4] = Point( 19*w/32, 3*w/8 );
rook_points[0][5] = Point( 3*w/4, 3*w/8 );
rook_points[0][6] = Point( 3*w/4, w/8 );
rook_points[0][7] = Point( 26*w/40, w/8 );
rook_points[0][8] = Point( 26*w/40, w/4 );
rook_points[0][9] = Point( 22*w/40, w/4 );
rook_points[0][10] = Point( 22*w/40, w/8 );
rook_points[0][11] = Point( 18*w/40, w/8 );
rook_points[0][12] = Point( 18*w/40, w/4 );
rook_points[0][13] = Point( 14*w/40, w/4 );
rook_points[0][14] = Point( 14*w/40, w/8 );
rook_points[0][15] = Point( w/4, w/8 );
rook_points[0][16] = Point( w/4, 3*w/8 );
rook_points[0][17] = Point( 13*w/32, 3*w/8 );
rook_points[0][18] = Point( 5*w/16, 13*w/16 );
rook_points[0][19] = Point( w/4, 13*w/16 );
const Point* ppt[1] = { rook_points[0] };
int npt[] = { 20 };
fillPoly( img,
ppt,
npt,
1,
Scalar( 255, 255, 255 ),
lineType );
}
void MyLine( Mat img, Point start, Point end )
{
int thickness = 2;
int lineType = LINE_8;
line( img,
start,
end,
Scalar( 0, 0, 0 ),
thickness,
lineType );
}
轮廓
如何在图像中寻找物体轮廓
在二值图像中寻找轮廓
CV_EXPORTS_W void findContours( InputOutputArray image, OutputArrayOfArrays contours,
                              OutputArray hierarchy, int mode,
                              int method, Point offset = Point());
参数:
- image: 8 位单通道图像,非零像素视为 1,零值像素视为 0,因此所有的输入图像均被视为二值图像。因此在应用时我们一般会利用 Canny, compare, InRange, threshold, adaptiveThreshold 等函数处理得到二值图像。如果模式为RETR_CCOMP 或者RETR_FLOODFILL,输入也可以是32 位的灰度图像。
- contours: 检测到的轮廓,每个轮廓都储存为一组点向量,定义为std::vector<std::vectorcv::Point>。
- hierarchy: 可选输出向量,定义为 std::vectorcv::Vec4i,包含有图像拓扑信息。其内部元素的个数等同于所检测轮廓的个数。Vec 4i 是Vec <int, 4>的别名,定义为向量内每一个元素包含4 个int 型变量。hierarchy 向量内第i 个轮廓的4 个int型变量(hierarchy[i][0], hierarchy[i][1], hierarchy[i][2], hierarchy[i][3])分别表示其同一层级下的后一个轮廓,前一个轮廓,子轮廓以及父轮廓的索引编号。如果轮廓 i 没有对应的上述轮廓,则 hierarchy[i][0], hierarchy[i][1], hierarchy[i][2], hierarchy[i][3]被置为-1。
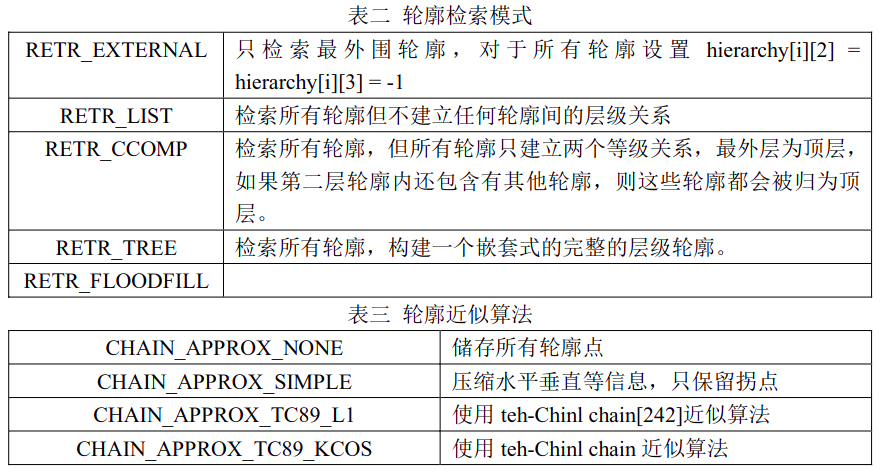
- mode: 轮廓的检索模式。具体见下表二。
- method: 轮廓的近似方法。具体见表三。
- offset: Point 偏移量
轮廓的绘制
CV_EXPORTS_W void drawContours( InputOutputArray image, InputArrayOfArrays contours,
                              int contourIdx, const Scalar& color,
                              int thickness = 1, int lineType = LINE_8,
                              InputArray hierarchy = noArray(),
                              int maxLevel = INT_MAX, Point offset = Point() );
参数:
- image: 目的图像。
- contours: 所有输入轮廓,每个轮廓储存为一组点向量。
- contourIdx: 指示要绘制的轮廓线参数,如果为负,则绘制所有轮廓线。
- color: 轮廓线颜色。
- thickness: 绘制轮廓线的粗细,如果为负(thickness=FILLED),则轮廓内部也会被绘制。当thickness=FILLED 时,即使没有提供层级数据,也能成功绘制有孔的轮廓。
- lineType: 直线绘制算法。
- hierarchy: 可选层级信息,只有当想绘制多条轮廓时才需要用到。
- mexLevel: 所绘制轮廓的最大层级。如果是0,则只绘制指定的轮廓;如果是1,则绘制指定轮廓以及嵌套轮廓;如果是2,则绘制指定轮廓、嵌套轮廓以及嵌套轮廓的嵌套轮廓以此类推。该参数只在层级参数可用时可以使用。
- offset: Point 的偏移
实例
#include "opencv2/imgcodecs.hpp"
#include "opencv2/highgui.hpp"
#include "opencv2/imgproc.hpp"
#include <iostream>
using namespace cv;
using namespace std;
Mat src_gray;
int thresh = 100;
RNG rng(12345);
void thresh_callback(int, void* );
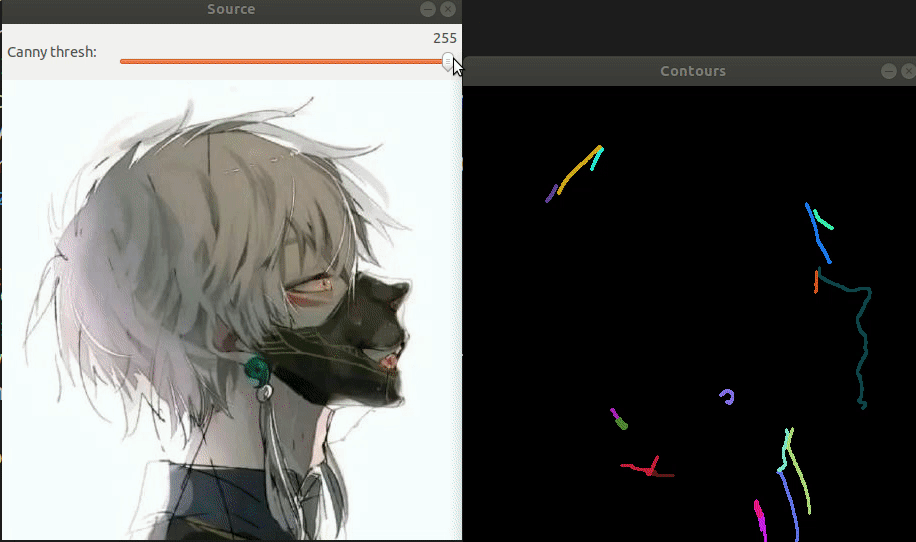
int main( int argc, char** argv ) {
//读取图像
Mat src = imread( "1.jpg", IMREAD_COLOR );
if( src.empty() )
{
cout << "Could not open or find the image!\n" << endl;
cout << "Usage: " << argv[0] << " <Input image>" << endl;
return -1;}
//转化为灰度图像,模糊处理以去除噪声
cvtColor( src, src_gray, COLOR_BGR2GRAY );
blur( src_gray, src_gray, Size(3,3) );
//创建名为Source 的窗口并在其中显示输入图像
const char* source_window = "Source";
namedWindow( source_window );
imshow( source_window, src );
const int max_thresh = 255;
createTrackbar( "Canny thresh:", source_window, &thresh, max_thresh, thresh_callback );
thresh_callback( 0, 0 );
waitKey();
return 0;
}
void thresh_callback(int, void* )
{
Mat canny_output;
//Canny 边缘检测
Canny( src_gray, canny_output, thresh, thresh*2 );
vector<vector<Point> > contours;
vector<Vec4i> hierarchy;
//寻找轮廓的函数
findContours( canny_output, contours, hierarchy, RETR_TREE,
CHAIN_APPROX_SIMPLE );
Mat drawing = Mat::zeros( canny_output.size(), CV_8UC3 );
for( size_t i = 0; i< contours.size(); i++ )
{
Scalar color = Scalar( rng.uniform(0, 256),
rng.uniform(0,256), rng.uniform(0,256) );
//轮廓绘制
drawContours( drawing, contours, (int)i, color, 2, LINE_8,
hierarchy, 0 );
}
imshow( "Contours", drawing );
}
凸包函数
CV_EXPORTS_W void convexHull( InputArray points, OutputArray hull,
                              bool clockwise = false, bool returnPoints = true );
参数:
- points: 输入的二维点集,存储在std::vector 或者Mat 中
- hull: 输出找到的凸包。
- clockwise: 操作方向,当 clockwise=true 时,输出凸包为顺时针方向。否则输出凸包方向为逆时针方向。
- returnPoints: 操作标识符,默认值为 true,此时返回各凸包的各点,否则返回凸包各点的索引。当输出数组为std::vector 时,此标识被忽略
#include "opencv2/imgcodecs.hpp"
#include "opencv2/highgui.hpp"
#include "opencv2/imgproc.hpp"
#include <iostream>
using namespace cv;
using namespace std;
Mat src_gray;
int thresh = 100;
RNG rng(12345);
void thresh_callback(int, void* );
int main( int argc, char** argv )
{
    Mat src = imread( "11.png" , IMREAD_COLOR);
    if( src.empty() )
    {
        cout << "Could not open or find the image!\n" << endl;
        cout << "Usage: " << argv[0] << " <Input image>" << endl;
        return -1;
    }
    cvtColor( src, src_gray, COLOR_BGR2GRAY );
    blur( src_gray, src_gray, Size(3,3) );
    const char* source_window = "Source";
    namedWindow( source_window );
    imshow( source_window, src );
    const int max_thresh = 255;
    createTrackbar( "Canny thresh:", source_window, &thresh, max_thresh, thresh_callback );
    thresh_callback( 0, 0 );
    waitKey();
    return 0;
}
void thresh_callback(int, void* )
{
    Mat canny_output;
    Canny( src_gray, canny_output, thresh, thresh*2 );
    vector<vector<Point> > contours;
    findContours( canny_output, contours, RETR_TREE, CHAIN_APPROX_SIMPLE );
    //利用凸包函数找到图形中的凸包
    vector<vector<Point> >hull( contours.size() );
    for( size_t i = 0; i < contours.size(); i++ )
    {
        convexHull( contours[i], hull[i] );
    }
    //绘制轮廓与凸包
    Mat drawing = Mat::zeros( canny_output.size(), CV_8UC3 );
    for( size_t i = 0; i< contours.size(); i++ )
    {
        Scalar color = Scalar( rng.uniform(0, 256), rng.uniform(0,256), rng.uniform(0,256) );
        drawContours( drawing, contours, (int)i, color );
        drawContours( drawing, hull, (int)i, color );
    }
    imshow( "Hull demo", drawing );
}